Epson´s consumer scanners all come with "Epson Scan", a scanning software for all needs. Many scanner operators however tend to use third party software for their scanning tasks. Today I will show you how to get good results from Epson Scan, but I will also try to elaborate the drawback of Epson Scan and why Silverfast will give you even better results in the end.
As an important note at the beginning: I am not affiliated to Silverfast and do not get any money from them to write reviews. I honestly think you can get wonderful results without their software and this is why I write this tutorial. However I also think for the finest results and the most comfortable and economic workflow there is no way around Silverfast.
For all my scans I use a two step workflow, which means that I do a basic 48bit color scan with the scanning software and do the final adjustments in Adobe Lightroom. This will give me the greatest flexibility and best results.
Part I - Epson Scan
1. Preferences - Configuration
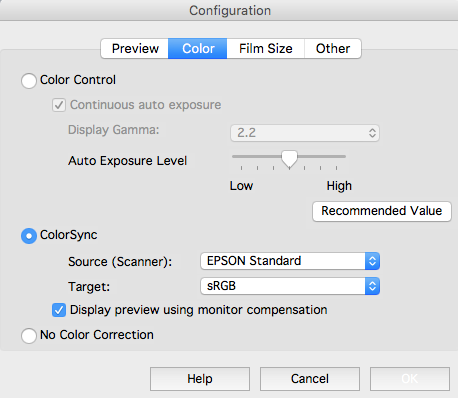

- Choose the Color Sync Option and select sRGB or Adobe RGB as output profile.
- Either use the Epson Standard input profile or a dedicated calibrated scanner profile.
- Leave the other options according to your needs.
2. Settings
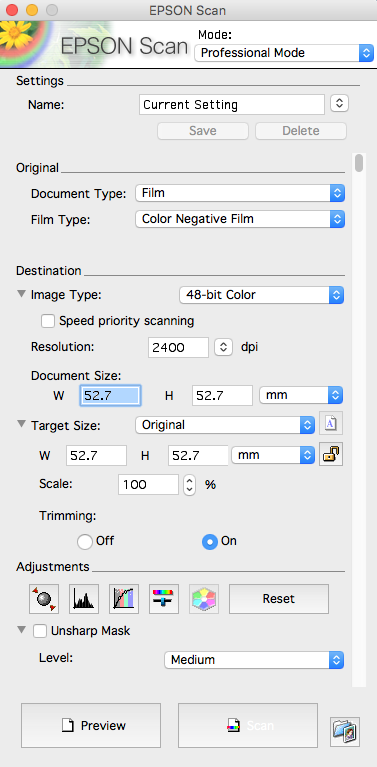

- Choose professional mode
- Select Film as document type
- Select color negative film for film type
- Choose 48bit color
- Set the resolution according to the optical resolution of your scanner: 2400dpi works very well for Epson V700-V850.
- Uncheck Unsharp Mask
- Uncheck Grain Reduction
- Uncheck Backlight Correction
- Uncheck Dust Removal
- Select Digital ICE if you want
Note: Digital ICE does work reasonably well with Epson Scan. However scanning time increases significantly and details get a little bit blurred.
3. Pre-Scan
Hit the preview button for a Pre-Scan.
This is how the preview of the scan area will look like. Pretty nasty color shifts and ugly looking images.

4. Frame
Next, you will need to define the scan area by setting up the scanning frame. Make sure you stay inside the negative area and don´t select the holder or the film border.


5. Adjustments
You can either fully adjust the scan to your needs in Epson Scan or rely on the flexible workflow of Lightroom. What Epson Scan basically offers are traditional image manipulation algorithms. Same tools are available in Lightroom with the one significant benefit of the non-destructive Lightroom workflow. In order to get some work out of the way I suggest using the auto-correction in Epson Scan which will bring us on the right path. The Auto function will do a basic color and contrast correction and is called "auto-exposure". This is quite a misleading name for this button as it acts more or less as an auto-correction button. You can enable a continues "auto-exposure" function in the settings if you like.

The "auto-exposure" button is the icon withe two arrows and the small sphere on the left hand side of the screenshot.
If you are not interested in a flexible workflow you can do all the final adjustments directly in Epson Scan. Click on the button with color spectrum (second from the right) to bring up the adjustment panel. As I prefer to do all these steps at a later stage, I skip this panel in this tutorial. The slider are pretty much self-explanatory in my opinion.

6. Final Settings
After hitting the scan button select the following file options. If you have decided to skip the second part of the workflow and did all the adjustments in the previous step, you can select "jpeg" otherwise I highly recommend "Tiff" as the file format. This will give you enough headroom for all Lightroom adjustments.

Part II - Lightroom Adjustments
This is how the scanned image looks like after opening in Lightroom.

1. Sharpening and Noise Reduction
You may just use the settings from the screenshot or experiment with your own settings. Different scans might need different amounts of sharpening. I found those values very good for 2400ppi scans. Note that I also add some noise reduction. This reduces sensor noise from the scanner and is not intended to reduce grain.

2. Contrast Curve or Paper Curve
This is probably a controversial step. The shown contrast curve is always a rough guess to get close to a traditional paper curve. My idea is to get as close to the look of scans from "minilab" scanners like the Fuji Frontier. Fact is that the image needs a certain amount of contrast and we maybe need to apply different kind of contrast curves according to the captured scene. How this contrast curve will look like is not necessarily fixed. Remember there is no right or wrong. Unfortunately it proofed very hard to get a single curve that replicates the paper curve of color paper in the wet darkroom.


After the contrast curve has been applied we might need to adjust the tonal values in the basic panel. Highlight or shadow recovery might be required. Another benefit from using Lighroom for post-processing. However, avoid drastic changes as this might destroy the film character of the scan.
3. Color Balancing
When color correcting in Lightroom the histogram is a wonderful guide. Try to increase the gray area below the histogram to neutralize color shifts. Color correction is a difficult task and often the biggest problem for good scanning results. It is a matter of experience. I will address some basic tips for color correction in an upcoming post.
- Use the TEMP slider to compensate for either a cool or warm cast. This slider is originally for setting the white balance of digital raw files and not perfectly suitable for color correcting a scan. Bt with some experience you will learn how to use this slider to get perfectly neutral scans.
- The TINT slider is for a "GREEN" respectively "MAGENTA" cast
- The biggest problem is that "RED" and "CYAN" casts needs to be either eliminated by a combination of the "TEMP" and "TINT" slider or by using the color curves in the "TONE CURVE" section
Note: If you feel this step counterintuitive you always have the option to finalize all color corrections in Epson Scan using the "Image Adjustment" panel. However I often encounter additional color shifts after the final scan has been made. I have been told that these additional casts are due to a phenomena called "registration issue" and has to do with the overall precision and calibration of the scanner.

Now our scan is ready for local adjustments if required. As a side note, I normally don´t do a lot of local adjustments or at least only subtle adjustments to my color scans as overdoing this, often throws off the overall balance of the image. This is totally different for black and white scans. A black and white scan lives from the interpretation and local adjustments. See my black and white master scan series for further details. Below you will find a comparison of several scans and my final version of the scanned negative.
Final Conclusion and Overview
Frontier Scan by "MeinFilmLab"
Profiled Epson Scan no ICE applied
Un-profiled Epson Scan no ICE applied
Silverfast Scan with ICE applied
Final scan from Epson Scan and Adobe Lightroom. This scan has been done with a custom made scanner profile and Digital ICE applied.
The whole idea of the tutorial was to provide you with a solid workflow to get good results from you Epson scanner. Nevertheless I want to point out some drawbacks of "Epson Scan". While Epson Scan is a good piece of software and it does not have to be purchased separately, I also lacks a certain ability to render fine details, especially when used with digital ICE. Digital ICE increases scanning times significantly and the algorithms are not as good as in Silverfast´s iSRD technology. I also use a custom made scanner profile together with Epson Scans. This has improved my results dramatically. I know that a common concept says that there is no way to profile scanners for color negative film. But with the manufacturer variation in mind, I think it can be helpful to make a color profile for positives that ensure correct replication of the underlying linear scan before inversion. This has nothing to do with calibrating the process from scene to final scan. I am not a scientist and I don´t want to claim anything, but decide yourself, which of the scans you prefer most: the one with the custom profile or the default Epson profile.
I also added a Silverfast scan. The colors in the Silverfast scan look a bit different, which is probably due to some slightly variations in the color corrections by myself. The tools available in Silverfast for color balancing are much more sophisticated to what is available in Epson Scan. In Epson Scan I almost solely rely on on the auto feature as a lack of a good histogram and "Lab" readouts make precise color correction impossible. One last benefit of Silverfast is the multi-exposure function. This will reduce scanner noise significantly and is very useful, not only for slide scanning but also for color negative scanning.
In the end, if you compare the Epson Scan final version with the version derived from the Fuji Frontier scanner, we can clearly see a difference, but nevertheless both scans look like a real film scan. We cannot compare these techniques as they are too different, but after all, you can see that it is possible to get descent results from Epson Scan with some work in Lightroom. Consistency in the workflow is key to the success in my opinion.
Hope you enjoyed the tutorial and let me know if you have different experiences, thoughts or questions.