Learn the most important facts about color negative film
The art of getting a good color print from a negtaive seems to be a dying craft. The modern photographer who still shoots color film normally uses a scanner to get to the desired print. The scanning process is much cheaper, less labor-some and more flexible. In order to learn what is required to get descent scans from color negs, you need to be aware of some important facts.
Color negative has been designed as an intermediate medium to produce color prints. Other than slidefilm it needs to be printed before you can see the positive image. Film stock has been improved over many years and today we need to deal with the specific features, once established to get brilliant prints, when scanning the film. Let´s see what is problematic and how we deal with this problems. If we leave the basic scanning steps aside, we can boil down the additional issues to a number of four critical aspects: "Negative Inversion", "Film Characteristic Curve", "Orange Mask" and "Color Balance".
No. 1 - The Negative Inversion
Maybe this is the most obvious of all four points. The negative needs to be inverted after scanning. In the analog process this happens, when the printing paper is exposed. The positive image becomes visible after paper development. A scanner records luminance values which depend on the density of the negative. Therefore a CCD sensor is used to record the three color channels of red, green and blue. The luminance values of each channel will be processed and inverted by the scanner software. All we need to do is to tell the scanner that we want to scan negatives by selecting the type of input medium.
The problem is that there is not standardized inversion algorithm. You can find a document online that claims that the Photoshop inversion algorithm is not suitable for inverting color negatives as it impairs color integrity. This mathematical document is rather complicated in my view. Even though it sounds very plausible I think in the end it is not really relevant. While we of course want to get a truthful reproduction of the negative, we need to judge our hybrid workflow by the final image. Each scanner and software combination will produce slightly different color interpretations. If we accept this and if we can establish a reproducible and successful workflow, there is no need to question all the mathematical steps involved. Basically we need to trust the scanner software and how it handles the input values. In my opinion, only the final scan counts.
No.2 - The Film Characteristic Curve
The color printing process involves a rather strong contrast increase. This happens due to the nature of the printing paper. Normally the paper has a fixed contrast and after the paper choice has been made, we only have very little influence on print contrast. Tonal values get expanded when the paper is exposed. This means in order to allow a full range of scene luminance values to be printed on paper, these values need to be compressed in the negative. The printing paper has its specific response curve. The fact that the negatives show a very long straight density curve and a nice shoulder, makes printing of color negative easier. The exposure time of the paper can be used to correct for under- or overexposure up to a certain degree. It does however not change the distribution of the tonal values. The characteristic curve of the film has been designed to avoid blown out highlights and enough tonal separation.
Film Characteristic Curves in a Nutshell:
When exposing film, we allow light to fall on the emulsion and this will increase the density of the film. Some parts of the film get darker while other areas remain more translucent. The denser a negative the less light can shine through it during printing. This characteristic can be shown in a curve that is called "film characteristic curve". It shows the increase of density over exposure. The steeper this curve the bigger the contrast in the final print.
Scanning this flat density curve will give as a rather flat file. There is a lot of tonal expansion required to get the desired contrast in the digital print. The amount of required contrast however is not given. This is where we have more freedom than in the wet darkroom. The digital printer can decided about the contrast and tonal distribution of the scan. This ability however makes the scan from a negative an interpretative and artistic process. Depending on the software the scanner operator can decide what kind of response curve will be used during scanning. LaserSoft Imaging´s Silverfast software for example, allows the scanner operator to choose from various preset curves that have been designed to replicate the tonal response of specific film brands. Other scanners use a fixed response curve for film or don´t allow any interaction. To my knowledge the well known Fuji Frontier scanners, scan all film brands the same. They use a fixed response curve. This approach is quite useful to get a consistent look and requires less interpretation by the operator. At this point we need to hold on for a second and remember than we are now dealing with a digital file. This is different from wet printing. How much contrast we add, how we change the tonal distribution depends on our own artistic judgment. There is no wrong or right. In my opinion it is desired to make the final scan to look as natural as possible according to my eye and my taste. Personally I make these contrast and tonal adjustments not in the scanner software.
No.3 - The Orange Mask
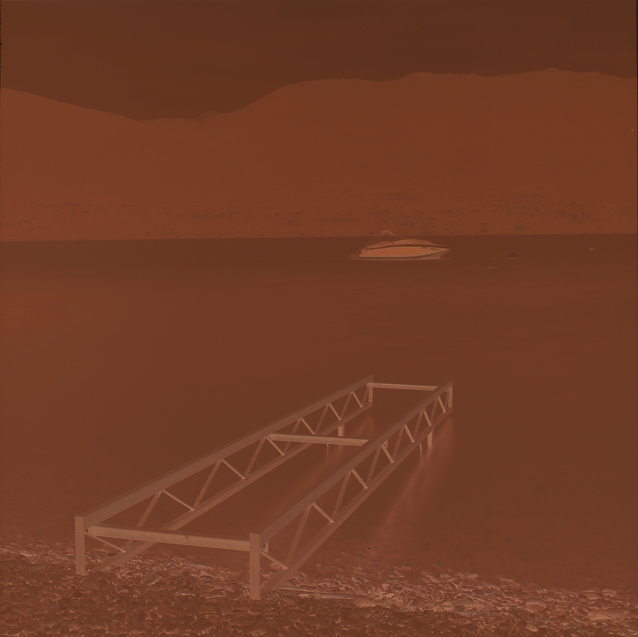
Now it is time to talk about the infamous "Orange Mask"! Everybody will tell you that scanning negatives is complicated due to the orange mask of color negative film. Let´s have a short look on how negative film works and then I can give you a very simple explanation of why the orange mask was required to allow darkroom printers to get good colors.
Simplified, a processed color negative film contains three layers with a negative image formed by "dyes clouds" in the three subtractive primary color yellow, magenta and cyan. Those three layers contain all information. The top layer is the yellow negative image, followed by the magenta and cyan layer. These dyes are unfortunately not pure and we get some contamination of other colors inside the layers. Impure dyes introduce wrong colors into the layers which need to be filtered out during printing. To help the darkroom printer, a simple idea has been established. An additional filter layers have been introduced which could be easily removed again during printing. This is known as the orange mask. A color printer would use a filter combination to eliminate any kind of color cast in the print. The requirement to use a filter to correct for the cast produced by the orange mask, also eliminated any unwanted color contamination. So what was done is the following, the impurity of the color layers is exaggerated in order to help the printer to see the impurity and take adequate countermeasure like the mentioned filtration. In the above shown density curve diagram we see the different densities of the three color channels. Our goal is to equalize these three curves.
When scanning negatives we need to remove the orange mask digitally or by the scanner hardware.
Correcting for the orange mask can be done by individually adjusting exposure time for the scanner in each RGB channels. This is called analog gain. Done right it can produce a scan that is close to neutral prior to inversion and will produce more equal RGB channels. As not every scanner and software is able to do so, we normally need to equalizing the RGB channels by setting the black and white point for each channel. This will normalize all three channels and if done correctly, this will remove the orange mask. Most scanner software does this automatically but it could be beneficial to tweak these settings. This will help to get a better removal of the orange mask. Small variations can change the color balance significantly. This operation increases contrast by tone expansion, therefore it is very important to use a 16bit file for this even when only a 8bit output file is required. The additional amount of tonal values in an 16bit file will help to avoid posterization or other artifacts
16bit Output and why it is so important for good quality scans:
Compensating for the orange mask and dealing with the required contrast expansion due to the flat density curve requires a lot of image manipulation. 16 bit files contain much more tonal values than 8bit files and therefore we get much better quality form 16bit scans than from 8bit scans. Therefore if a 8bit jpeg is selected for output, Silverfast for example is performing a 16bit scan which then will be saved as a 8bit jpeg after all the math is done.
No.4 - Color Balance
Finally we need to remove any color cast from the image. Almost all modern print film is daylight balanced. This means we get a good color balance under daylight conditions and chances are good that if we successfully removed the orange mask, we have a nicely balanced image already. However we rarely encounter perfect light, so in post-processing we have the chance to compensate for this by tweaking the curve of each channel. This process is very similar to what is done in the wet darkroom. Color correction can be done in several ways using either levels, curves or the color balance tool in either the scanning software or any kind of post-processing software. I also want to mention that color balancing might become necessary due to inaccurate film processing or variations during production of the film. In the wet darkroom the printer needed to set the color filtration to color balance the final print. This required many work prints before the final master print was created.
As we have seen, color negative film is not as straight forward as positive film. Its unique features make the scanning process and interpretive process. However I enjoy this process. It gives me enough freedom for personal artistic decisions. Nevertheless I always try to maintain the original character of the film by limiting my workflow to a minimal amount of processing steps.

