The image on the right hand side is the final master-print-file we want to create. On the left side we see the flat scan we imported into Lightroom. This is no magic, it is not a one-click solution or filter. It is pure dedication and digital darkroom printing to get a positive that holds the quality we are looking for. The difference is subtle, but significant.
The Digital "Master-Print-File"
In the previous part of this installment we have discussed how we get a flat scan from black and white film in Silverfast 8.8. In the second part of this series we concentrate on the creative process of taking a flat and lifeless scan to a wonderful black & white master print. While we should normally never constrain our creative freedom, I still suggest we try to maintain a believable plausibility, which means we want to maintain the characteristic of the medium. A photograph should be identified as one and as we have already made the effort of shooting film, we want to maintain the beauty of this medium in the final master file. The easiest way of doing this is by replicating the tools a darkroom printer uses when creating a print. Of course we use these techniques digitally. Good care needs to be taken to avoid digital artifacts and a digital look. This is not as easy as it sounds, as digital tools can easily make their marks. We do our best to avoid these marks.
Basic Adjustment After Import
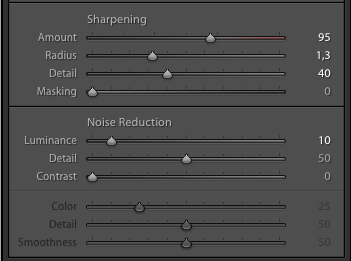
As soon as we have imported the file into Adobe Lightroom, I compensate for scanner artifacts and inaccuracy. Every sensor that converts analog to digital will inevitably reduce sharpness which we need to compensate for. I also realized a lack of definition in the scanned files which we need to take care of. Let´s take a closer look. I found the following sharpening settings best for 6x6 negatives scanned at 2400ppi in Silverfast. They work also for other film formats but maybe need more additional tweaking.
Lightroom Sharpening for 6x6 negatives scanned at 2400ppi
- Amount 95
- Radius 1,3
- Detail 40
- Masking 0
In a grayscale file we obviously don´t need color noise reduction but a low amount of luminance noise reduction can help to clean up the file. This has nothing to do with grain reduction, as I think we want to maintain grain as a significant character of film.
Luminance Noise Reduction for 6x6 negatives scanne on a Epson V700
- Luminance 10
- Detail 50
- Contrast 0
Definition
I have compared many scans from flatbed scanners with premium scans from Fuji, Kodak or Noritsu. The premium scanners render the scans with more clarity and presence. It seems like there is more definition that makes the viewer help to identify the scan as a photograph. It is very hard to describe this phenomena. I identified an additional contrast boost in the shadows that make the image more believable. Additionally I think a gamma of 1.8 or even lower helps as well to present the scan as a photographic print.
Dehaze and Clarity
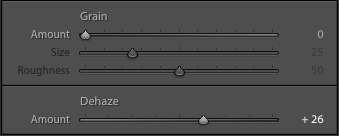
With Lightroom 6, Adobe introduced the "Dehaze" function with seemed to be the exact tool for adding the desired definition to a scanned negative. I found the following settings perfect for this.
- Clarity +10
- Dehaze + 26
1:1 View - this is a 100% crop that nicely shows the detail rendering and grain reproduction of the Epson V700 in combination with Silverfast 8.
This is however just a suggestion or maybe a starting point. If you feel like your image requires more sharpening or more noise reduction just go ahead and apply the required settings. In the screenshot above you can see the 100% view and how beautifully and nicely these sharpening settings improve detail reproduction.
Density Correction
Most scanner determine the best scanner exposure time by exposing the frame in a way that the thinnest part of the negative will just not overexpose. This ensures best tonal distribution in the linear file. This linear file will then be inverted by the software. As we are staying in the 16bit environment from scan to Lightroom we can make the brightness adjustments in Lightroom with greater control and flexibility than doing it in Silverfast. The term density correction which is often used in for this kind of brightness correction comes from professional scanners like the Fuji Frontier. Density correction compensates for over or underexposure of the frame during capture which leads to density variations in the negative. This is where the name density corrections comes from. Darkroom printers can adjust exposure time and filter gradation to compensate for it, we do it in software.
In Lightroom we should do brightness corrections before we adjust contrast and gradation. This will ensure we choose the correct contrast setting later on. Especially for black and white film, brightness is more or less a creative interpretation. We have scanned the negative in the best possible manner. What we do with information is up to us and we are free to creatively use this information. However keep an eye on the histogram. While I don´t think we should dogmatically avoid any blown areas we should always be aware of what is happening in the frame. Blocked shadows and blown highlights can be avoided and most often this is what we wan, but from time to time it can be interesting to go for a darker mood and live with blocked areas. Some printers even say a good print needs to have pure dark areas. When it comes to highlights, I think we can also live with small areas of pure white as this seems natural for very bright parts of a scene, but we should pay special attention of the transition into these areas of pure white. Highlight roll-off, the transition of tone from bright white to pure white, is an important quality aspect of a good print.
Contrast
Before we take care of the highlights and shadows we need to decide what contrast level we want in the image. During darkroom printing it is common to start with grade II filtration and see what the final print will look like. In Lightroom it is much easier to adjust contrast. We can either use the contrast slider or use the tonal control of the point curve to adjust our contrast level. Point curve presets can be used to replicate multigrade contrast filters. Going through all these presets allows us to see what suits the image best. Again, have a look at the histogram and avoid large areas of pure black or white. Some areas of blocked shadows or blown highlights can be recovered using the tonal control in Lightroom.
A comparison of the different contrast levels replicating the paper grades or filter sets from traditional darkroom printing.
This is another scan that shows and example of tone curve adjustments that replicate paper grades from wet printing.
Tonal Control
In order to control highlights and shadows I use the highlight and shadows sliders in Lightroom. In combination with the "blacks" and "whites" sliders you have a lot of control over the tonality of the final image. There are literally no rules for this but I would generally avoid extreme settings that destroy the tonal relationships we have scanned from film. We don´t want to introduce the digital look into the analog scan.
Exposure compensates for density variations. Tonal controls allow shadow and highlight recovery. They can be used for creative interpretation as well. Contrast is controlled by either the "contrast slider" or the Tone Cruve.
Now that we have taken care of density correction, detail rendering and tonal distribution we are ready to move from global corrections to local adjustments. Darkroom printers used edge burning, local dodging an burning, multi-contrast printing and selective bleaching to make sure the final print looks like the envisioned during capture. This is a tedious task that requires concentration and a very high skill level. Lightroom´s local adjustment brush and the radial and the graduated filter tool help us to get similar results with even more precision. This will be covered in the next installment of this master print series. Our final print is only a few clicks away.


